What is the best way to measure your head for a bicycle helmet? The best way is to use a flexible measuring tape, wrap it around your head about an inch above your eyebrows and ears, and take the measurement in centimeters or inches. Getting the right bicycle helmet sizing is crucial for safety and comfort. This guide provides step-by-step helmet sizing instructions to help you find the perfect cycling helmet fit.
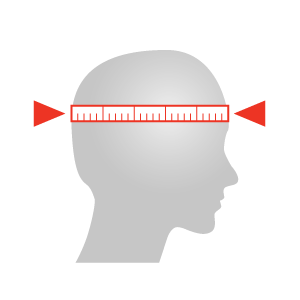
Image Source: www.edinburghbicycle.com
Why Accurate Head Measurement Matters for Helmet Fit
A bicycle helmet is designed to protect your head in the event of a crash. However, it can only do its job effectively if it fits correctly. An ill-fitting helmet can slide around during impact, exposing areas of your head to potential injury. Accurate head measurement is the first step in finding correct helmet size and ensuring your bicycle helmet will provide optimal protection. A loose helmet offers less protection. A tight helmet can be uncomfortable and even cause headaches. Taking the time to accurately measure your head for a helmet will significantly increase your safety and enjoyment while cycling.
Tools You’ll Need for Measuring Head For Helmet
Before you begin measuring, gather these simple tools:
- Flexible Measuring Tape: A soft, flexible measuring tape is essential for getting an accurate head circumference measurement. Avoid using a metal measuring tape, as it won’t conform to the shape of your head.
- Mirror: A mirror will help you ensure the measuring tape is positioned correctly around your head.
- Helper (Optional): While you can measure your head yourself, having a friend or family member assist you can make the process easier and more accurate.
Step-by-Step: Measuring Your Head for a Bicycle Helmet
Follow these helmet sizing instructions to get an accurate head measurement:
- Position the Measuring Tape: Place the flexible measuring tape around your head, approximately one inch (2.5 cm) above your eyebrows and just above your ears. This is the widest part of your head.
- Ensure a Level Measurement: Make sure the measuring tape is level all the way around your head. Use a mirror to check the position.
- Take the Measurement: Hold the measuring tape snugly but not too tightly. Read the measurement at the point where the tape overlaps.
- Record the Measurement: Note the measurement in centimeters (cm) or inches. This is your head circumference.
- Measure Multiple Times: It’s a good idea to measure your head two or three times to ensure you get a consistent measurement.
Visual Aid: Where to Place the Measuring Tape
Imagine a line going around your head, starting one inch above your eyebrows, passing just above your ears, and circling back to the front. The measuring tape should follow this line.
Bicycle Helmet Size Chart: Finding Your Match
Once you have your head circumference measurement, use a bicycle helmet size chart to determine the appropriate helmet size. Most manufacturers provide a bicycle helmet size chart on their website or on the helmet packaging. These charts typically correlate head circumference ranges with helmet sizes (e.g., Small, Medium, Large).
Here’s an example of a typical bicycle helmet size chart:
| Helmet Size | Head Circumference (cm) | Head Circumference (inches) |
|---|---|---|
| X-Small | 48-52 | 18.9-20.5 |
| Small | 52-56 | 20.5-22 |
| Medium | 56-59 | 22-23.2 |
| Large | 59-62 | 23.2-24.4 |
| X-Large | 62-65 | 24.4-25.6 |
Note: This bicycle helmet size chart is just an example. Always refer to the manufacturer’s specific bicycle helmet size chart for the most accurate sizing information.
What If You’re Between Sizes?
If your head measurement falls between two sizes on the bicycle helmet size chart, it’s generally recommended to choose the larger size. You can then use the helmet’s internal fit system (usually a dial at the back) to fine-tune the fit and ensure a snug, secure feel.
Trying On Your Helmet: Beyond the Measurement
Measuring your head is an excellent starting point, but it’s crucial to physically try on the helmet to confirm the cycling helmet fit. Here’s what to look for when trying on a helmet:
- Proper Positioning: The helmet should sit level on your head, covering your forehead. There should be approximately one inch (2.5 cm) between your eyebrows and the front edge of the helmet.
- Snug Fit: The helmet should feel snug but not uncomfortably tight. You should be able to move your head around without the helmet shifting.
- Adjust the Retention System: Use the helmet’s retention system (usually a dial or adjustable straps at the back) to tighten or loosen the fit. The helmet should feel secure and stable.
- Adjust the Chin Strap: Adjust the chin strap so that it sits comfortably under your chin. There should be enough slack to allow you to open your mouth comfortably, but not so much that the helmet can be pulled off.
- The “Y” Adjustment: The straps forming a “Y” shape should sit comfortably around your ears. Adjust them as needed to ensure they don’t pinch or rub.
- The Shake Test: Once you’ve adjusted the helmet, perform a “shake test.” Fasten the chin strap and shake your head from side to side and up and down. The helmet should stay securely in place. If it moves significantly, readjust the fit or try a different size.
Key Features to Consider When Choosing a Bicycle Helmet
Beyond size, consider these features when selecting a bicycle helmet:
- Ventilation: Look for a helmet with ample vents to keep your head cool and comfortable, especially during warm weather.
- Safety Certifications: Ensure the helmet meets safety standards such as CPSC (Consumer Product Safety Commission) in the United States or CE EN 1078 in Europe. These certifications indicate that the helmet has been tested and meets minimum safety requirements.
- MIPS (Multi-Directional Impact Protection System): MIPS is a technology that helps reduce rotational forces during impact. Helmets with MIPS may offer an extra layer of protection.
- Comfort Features: Consider features like padding, adjustable straps, and a visor for added comfort and convenience.
- Type of Riding: Choose a helmet designed for your type of cycling. Road helmets are typically lightweight and aerodynamic, while mountain bike helmets offer more coverage and protection.
Factors Affecting Bicycle Helmet Sizing
Several factors can influence bicycle helmet sizing and fit:
- Hair Volume: If you have thick hair, it may affect the fit of the helmet. Consider wearing your hair in the style you typically ride with when trying on helmets.
- Head Shape: People have different head shapes (e.g., round, oval). Some helmets are designed to fit specific head shapes better than others.
- Age: Children’s heads grow quickly, so it’s essential to regularly check the fit of their helmets. Replace a child’s helmet when it becomes too small.
- Helmet Design: Different helmet models may fit differently, even if they are the same size. It’s always best to try on several helmets to find the one that fits you best.
Tips for Ensuring a Long-Lasting and Safe Helmet
To maximize the lifespan and effectiveness of your bicycle helmet:
- Replace After Impact: Even if a helmet looks undamaged after a crash, it should be replaced. The internal foam may have been compressed, reducing its ability to absorb impact in a future crash.
- Replace Every 3-5 Years: Over time, the materials in a helmet can degrade, even if it hasn’t been involved in a crash. Replace your helmet every 3-5 years, or sooner if you notice any signs of wear and tear.
- Store Properly: Store your helmet in a cool, dry place away from direct sunlight and extreme temperatures. Heat can damage the foam and shell of the helmet.
- Clean Regularly: Clean your helmet regularly with mild soap and water. Avoid using harsh chemicals or solvents, as they can damage the materials.
- Inspect Regularly: Regularly inspect your helmet for any signs of damage, such as cracks, dents, or loose straps.
Fathoming Different Helmet Types and Their Sizing
The type of cycling you do can influence the best helmet for you, and sometimes, the fit characteristics:
- Road Bike Helmets: These are designed for speed and efficiency on paved roads. They often prioritize aerodynamics and ventilation. They typically fit snugly and are lightweight.
- Mountain Bike Helmets: These offer more coverage, especially at the back of the head, for increased protection on trails. They may also feature a visor to shield your eyes from the sun and debris. Their fit may be slightly more generous to accommodate the extra coverage.
- Commuter Helmets: Designed for everyday use in urban environments, commuter helmets often include features like integrated lights and reflective elements for increased visibility. The fit should be comfortable for longer periods.
- BMX Helmets: BMX helmets prioritize impact protection for the specific demands of BMX riding. They often have a more rounded shape and thicker padding. The fit is usually snug and secure.
- Kids’ Helmets: Designed specifically for children, these helmets come in smaller sizes and often feature fun designs. Regular checks on the fit are very important as children grow.
Common Mistakes to Avoid When Sizing a Bicycle Helmet
- Relying solely on size charts: While size charts are a helpful starting point, they are not a substitute for trying on the helmet.
- Ignoring the internal fit system: The retention system is crucial for fine-tuning the fit and ensuring a secure feel.
- Not adjusting the chin strap properly: The chin strap should be snug but not too tight.
- Failing to perform the shake test: The shake test is a simple way to check if the helmet is properly adjusted.
- Using a damaged or expired helmet: Always replace a helmet that has been involved in a crash or is past its expiration date.
- Buying a helmet that doesn’t fit now, with the hopes of growing into it: A helmet needs to fit correctly from day one to provide proper protection.
FAQ: Measuring Head For Bicycle Helmet
Q: How do I measure my head for a bicycle helmet if I don’t have a flexible measuring tape?
A: Use a piece of string or ribbon to measure your head circumference. Then, lay the string or ribbon flat and measure it with a ruler or standard measuring tape.
Q: Can I use my hat size to determine my bicycle helmet size?
A: No, hat sizes are not directly comparable to bicycle helmet sizes. Always measure your head circumference and refer to the manufacturer’s bicycle helmet size chart.
Q: What if my head measurement falls between two sizes?
A: Choose the larger size and use the helmet’s internal fit system to fine-tune the fit.
Q: How often should I replace my bicycle helmet?
A: Replace your helmet after any impact, or every 3-5 years, even if it hasn’t been involved in a crash.
Q: Where can I find a bicycle helmet size chart?
A: Most helmet manufacturers provide a bicycle helmet size chart on their website or on the helmet packaging.
Q: Why is my bicycle helmet loose?
A: A loose helmet can result from the incorrect size being selected, or the internal fit system not being properly adjusted. Readjust and if the helmet remains loose, try a smaller size.
Unlock a safer, more exhilarating ride by meticulously following these helmet sizing guidelines. Investing a few moments to secure that ideal cycling helmet fit isn’t just about comfort; it’s a crucial upgrade to your protection and overall biking pleasure. Make safety your non-negotiable priority, and never forget that a perfectly snug helmet stands as one of your most vital cycling companions.

Hi, I’m Hector Quintanilla, the creator of helmetslab.com.. As a passionate enthusiast and experienced expert in helmets, I’ve dedicated this platform to sharing my insights, knowledge, and hands-on experiences. Whether you’re seeking the best helmet for safety, comfort, or performance, my goal is to guide you with detailed reviews, tips, and advice. Ride safe, and let’s explore the world of helmets together!