Does your old vinyl floor look a little tired? Maybe you’re dreaming of a fresh new look for your kitchen or bathroom, but a full replacement feels too expensive or like too much work. You’re not alone! Many homeowners want to update their vinyl floors without the hassle and cost of ripping them out and starting over.
The challenge, however, is finding the right paint. Not all paints stick well to vinyl, and using the wrong one can lead to peeling, chipping, or a finish that just doesn’t look good. It can be confusing to know which products are made for vinyl and which ones will give you the durable, beautiful results you’re hoping for. You want a transformation, not a mess!
This post will help you cut through the confusion. We’ll explore the best types of paint specifically designed for vinyl flooring. You’ll learn what to look for in a product, how to prepare your vinyl surface for painting, and tips for getting a smooth, long-lasting finish. Get ready to discover how to give your vinyl floors a stunning makeover!
Our Top 5 Paint For Vinyl Flooring Recommendations at a Glance
Top 5 Paint For Vinyl Flooring Detailed Reviews
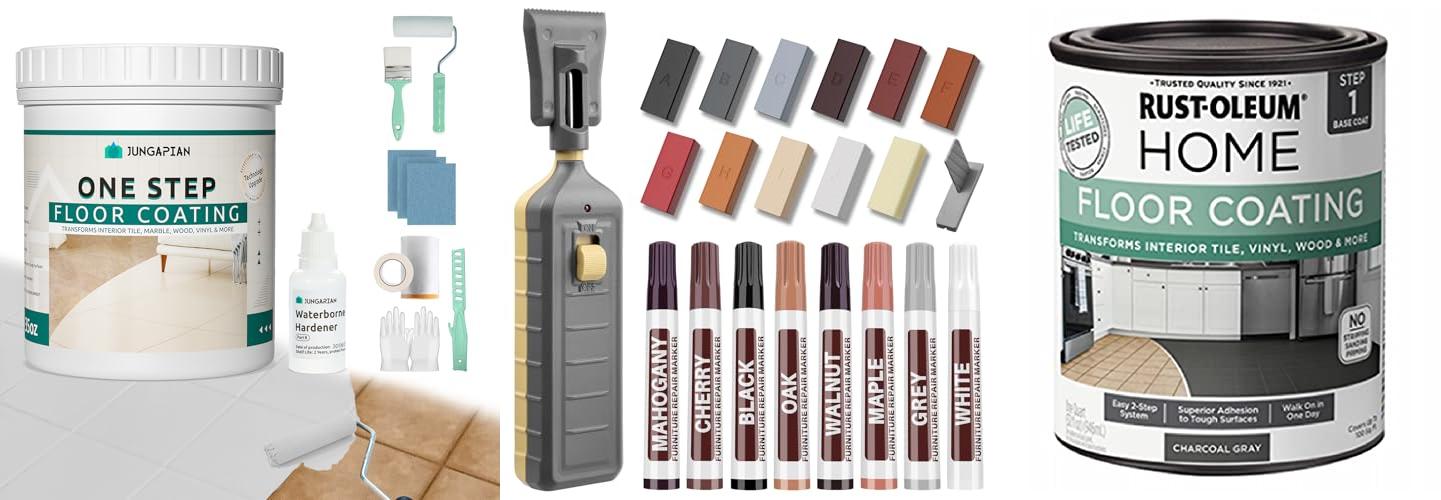
1. JUNGARIAN All-In-One Interior Floor Coating Kit

Rating: 9.2/10
Tired of looking at worn-out floors? The JUNGARIAN All-In-One Interior Floor Coating Kit in Light Grey is here to help! This innovative paint kit makes updating your floors simple and fast. You can transform old tiles, scratched hardwood, or faded laminate without the hassle of sanding or priming. Just open the can, mix the two parts, and start painting. It’s a great way to give your home a fresh new look.
What We Like:
- Easy to Use: It’s an all-in-one kit. No need for primer or top coats, saving you time and effort.
- Durable Finish: The paint creates a tough, waterproof layer that protects your floors from wear and tear, making them last longer.
- Low Odor & Non-Toxic: The water-based formula means it’s safe to use indoors with minimal smell, making your painting project more pleasant.
- Versatile: This paint works on many surfaces like ceramic, porcelain, hardwood, laminate, and vinyl. You can even use it on tubs, sinks, or cabinets.
- Beautiful Results: The light grey color is stylish and easy to keep clean. The paint levels itself, so you get a smooth, professional-looking finish, even if you’re a beginner.
What Could Be Improved:
- Color Options: While the light grey is nice, a wider range of color choices would be beneficial for more design flexibility.
- Application Tools: The kit doesn’t specify if special rollers or brushes are recommended for the best results.
This JUNGARIAN floor coating kit offers a fantastic solution for a quick and effective home makeover. It’s a smart choice for anyone wanting to refresh their floors and other surfaces with ease.
2. Vinyl Floor Repair Kit with Heat Pen – 11 Colors Hardwood Laminate Floor Wax Wood Furniture Touch Up Marker Linoleum Repair Kit Restore Any Scratches

Rating: 8.7/10
Scratches and dents on your wood floors, furniture, or cabinets can really dull your home’s shine. But what if you could easily fix those imperfections yourself? This Vinyl Floor Repair Kit with Heat Pen is designed to do just that. It comes with everything you need to bring your worn wood surfaces back to life, making them look like new again.
What We Like:
- It’s a high-quality kit made with safe resin that dries fast.
- It can fix many kinds of damage, like holes, cracks, and dents on floors, cabinets, and furniture.
- You get 11 wax block colors and 8 marker colors to match almost any wood shade.
- The heat pen makes it super easy to melt the wax and fill in damage.
- It’s versatile and works on wood floors, laminate, vinyl, linoleum, doors, and cabinets.
What Could Be Improved:
- While there are many colors, mixing them perfectly to match an exact shade might take a little practice.
- The heat pen heats up quickly, but you need to be careful to avoid touching the hot tip.
This kit offers a simple and effective way to repair common wood damage. It empowers you to handle minor fixes and keep your home looking its best.
3. Rust-Oleum 365928 Floor Coating Base Coat Charcoal Gray Quart

Rating: 9.5/10
Give your floors a fresh new look with the Rust-Oleum 365928 Floor Coating Base Coat in Charcoal Gray. This base coat is designed to create a smooth, even surface for your next floor project. It’s a great way to update tired-looking floors without the hassle of full replacement.
What We Like:
- Works on many different floor types like tile, wood, and vinyl.
- No need to sand, strip, or prime your floors first.
- Easy water-based formula makes cleanup simple.
- Provides a solid foundation for your chosen top coat.
- The charcoal gray color is a stylish neutral.
What Could Be Improved:
- Requires a separate Rust-Oleum top coat for a finished look.
- You need to wait 6 hours between the base coat and top coat, and 24 hours before walking on the floor.
- Caulk and wax must be removed for the best results.
This base coat is a good starting point for a floor makeover. Just remember to grab the matching top coat for a complete and durable finish.
4. Rust-Oleum 367597 Home Interior Floor Coating Kit

Rating: 9.5/10
Tired of looking at old, worn-out floors? The Rust-Oleum 367597 Home Interior Floor Coating Kit in Matte Black is here to help! This kit lets you give your floors a fresh, modern look without the huge expense of replacing them. It’s super easy to use, and you don’t need to do a lot of prep work like sanding or priming.
What We Like:
- It’s a budget-friendly way to update your floors.
- You can use it on many different kinds of floors, like tile, wood, and vinyl.
- It dries fast, so you can walk on it again in just 24 hours.
- The matte black color is stylish and can be mixed with other colors for a custom look.
- It’s tough and made to last through daily life.
- The two-part system is simple to apply and clean up is a breeze.
- It has a low odor, which is great for use inside your home.
What Could Be Improved:
- The kit covers up to 100 sq. ft., so you might need more for larger rooms.
- While it adheres well, very damaged floors might still need some minor repairs before application.
This Rust-Oleum kit offers a fantastic solution for a quick and affordable floor makeover. It’s a smart choice for anyone wanting to refresh their living space.
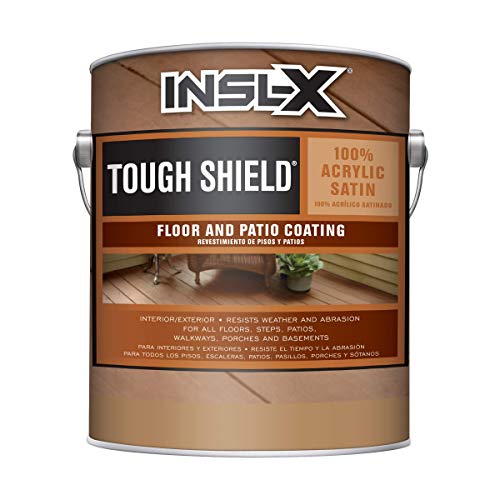
5. INSL-X Tough Shield Floor and Patio Paint
Rating: 8.7/10
Transform your outdoor spaces and indoor floors with INSL-X Tough Shield Floor and Patio Paint in a rich Saddle Brown. This one-gallon can delivers a tough, long-lasting finish that can handle all sorts of wear and tear. It’s perfect for breathing new life into your concrete patios, wooden decks, or even interior concrete floors.
What We Like:
- It creates a super tough finish that resists scratches and scuffs.
- The paint stands up to cleaning products, oil, and grease, making cleanup easy.
- It’s made to handle water sitting on the surface, so puddles won’t ruin your paint.
- You can use it inside or outside on concrete, wood, and masonry.
- It gives a nice, subtle satin sheen that looks great.
- It covers a good area, about 350-450 square feet per gallon.
What Could Be Improved:
- It’s not meant for garage floors or where cars park, so keep that in mind.
- You need to wait for warmer weather (above 50°F) to paint.
- Always read the label for the best way to prepare your surface before you start painting.
This INSL-X Tough Shield paint is a solid choice for anyone looking to protect and beautify their floors with a durable, attractive finish. It’s a great way to upgrade your home’s look and functionality.
Painting Your Vinyl Flooring: A Smart Makeover Guide
Thinking about a fresh look for your vinyl floors? Painting them is a fantastic way to update your space without the hassle and expense of replacing them. This guide will help you choose the best paint and get the job done right.
1. Key Features to Look For in Vinyl Floor Paint
When you’re shopping for paint to use on vinyl flooring, keep these important features in mind:
- Durability: You need a paint that can handle foot traffic, furniture moving, and everyday wear and tear. Look for paints specifically designed for floors or high-traffic areas.
- Adhesion: The paint needs to stick well to the vinyl surface. Good adhesion prevents peeling and chipping.
- Flexibility: Vinyl flooring can sometimes expand or contract with temperature changes. A flexible paint will move with the vinyl, reducing the chance of cracking.
- Water Resistance: Especially for kitchens and bathrooms, a paint that repels water is a big plus.
- Low VOCs (Volatile Organic Compounds): These are chemicals that can be harmful to your health and the environment. Paints with low VOCs are safer to use indoors.
- Finish Options: Do you want a matte, satin, or semi-gloss look? Most floor paints come in various finishes.
2. Important Materials You’ll Need
Besides the paint itself, gather these supplies:
- Vinyl Floor Cleaner/Degreaser: This is crucial for cleaning the floor thoroughly.
- TSP (Trisodium Phosphate) or a Strong All-Purpose Cleaner: For stubborn grease and grime.
- Sandpaper (medium-grit, like 120-180 grit): To lightly scuff the surface for better paint adhesion.
- Primer (optional but recommended): A good quality primer designed for vinyl or plastic surfaces will improve adhesion and durability.
- Paint Rollers: Use a high-density foam roller or a low-nap roller for a smooth finish.
- Paint Brushes: For cutting in edges and corners.
- Painter’s Tape: To protect baseboards and walls.
- Top Coat/Sealer (optional but recommended): A clear top coat adds extra protection and can enhance the finish.
3. Factors That Improve or Reduce Quality
The quality of your painted vinyl floor depends on a few things:
Factors That Improve Quality:
- Proper Preparation: This is the most important step! A clean, properly prepped surface is key.
- Using a Good Primer: Primer acts as a bonding agent and helps the paint last longer.
- Applying Thin Coats: Multiple thin coats are better than one thick coat. They dry more evenly and are less likely to peel.
- Allowing Proper Drying Time: Each coat needs to dry completely before the next one is applied.
- Using a Top Coat: A good top coat seals the paint and makes it more resistant to wear.
Factors That Reduce Quality:
- Incomplete Cleaning: Any dirt, grease, or old wax left on the floor will prevent the paint from sticking properly.
- Skipping the Primer: This can lead to poor adhesion and the paint peeling off quickly.
- Painting Over a Damaged Surface: If the vinyl is already peeling or damaged, painting won’t fix those issues.
- Using the Wrong Type of Paint: Regular wall paint or house paint won’t hold up to floor traffic.
- Rushing the Process: Not allowing enough drying time between coats is a common mistake.
4. User Experience and Use Cases
Painting vinyl floors is a popular DIY project. Many people choose it to:
- Revamp Rental Properties: It’s a cost-effective way to update floors without permanent changes.
- Refresh Old Vinyl: Give worn-out vinyl a new lease on life, saving money on replacement.
- Create a Custom Look: Experiment with colors and patterns to match your decor.
- Temporary Updates: Paint can be a good option for a temporary change before a more permanent renovation.
Users often report that a well-prepped and properly painted vinyl floor can last for several years with good care. However, it’s important to manage expectations; painted vinyl may not be as durable as brand-new vinyl flooring. With the right paint and careful application, you can achieve a beautiful and updated floor.
Frequently Asked Questions (FAQ) about Painting Vinyl Flooring
Q: Can I paint any type of vinyl flooring?
A: Yes, you can paint most types of vinyl flooring, including sheet vinyl, vinyl planks, and vinyl tiles. The key is proper preparation.
Q: What is the best type of paint for vinyl floors?
A: Look for paints specifically labeled for floors, vinyl, or high-traffic surfaces. Latex-based paints with good adhesion are often recommended.
Q: Do I need to prime vinyl floors before painting?
A: While not always mandatory, priming is highly recommended. A good primer will improve adhesion, durability, and the overall finish.
Q: How do I prepare the vinyl floor for painting?
A: Clean the floor thoroughly with a degreaser, then lightly sand it with fine-grit sandpaper to create a surface the paint can grip.
Q: How many coats of paint do I need?
A: Typically, two to three thin coats are sufficient for good coverage and durability.
Q: How long does painted vinyl flooring last?
A: With proper application and care, painted vinyl floors can last for several years. However, they might require touch-ups over time.
Q: Can I use a roller or a brush?
A: A high-density foam roller is best for a smooth finish. Use brushes for edges and corners.
Q: What if my vinyl floor has texture?
A: Textured vinyl can be painted, but you might need an extra coat or a roller with a slightly denser nap to get into the grooves.
Q: How long should I wait between coats?
A: Always check the paint can for specific drying times, but generally, wait at least 4-6 hours between coats.
Q: Can I paint over old vinyl flooring that is already peeling?
A: No, you should not paint over peeling vinyl. The peeling areas need to be repaired or the old flooring removed before painting.
In conclusion, every product has unique features and benefits. We hope this review helps you decide if it meets your needs. An informed choice ensures the best experience.
If you have any questions or feedback, please share them in the comments. Your input helps everyone. Thank you for reading.

Hi, I’m Hector Quintanilla, the creator of helmetslab.com.. As a passionate enthusiast and experienced expert in helmets, I’ve dedicated this platform to sharing my insights, knowledge, and hands-on experiences. Whether you’re seeking the best helmet for safety, comfort, or performance, my goal is to guide you with detailed reviews, tips, and advice. Ride safe, and let’s explore the world of helmets together!